Creating Self-Signed Certificates for TLS Contexts
You can assign a certificate that is digitally signed by the device itself to a TLS Context (i.e., self-signed certificate). In other words, the device acts as a CA. The Issuer (e.g., "Issuer: CN=ACL_5967925") and Subject (e.g., " Subject: CN=ACL_5967925") fields of the self-signed certificate have the same value.
|
●
|
The device is shipped with a default TLS Context (Index 0 and named "default"), which includes a self-generated random private key and a self-signed server certificate. The Common Name (CN or subject name) of the default certificate is "ACL_nnnnnnn", where nnnnnnn denotes the serial number of the device. |
|
●
|
Creating a self-signed certificate is traffic affecting. |
|
➢
|
To create and assign a self-signed certificate to a TLS Context: |
|
1.
|
Make sure that you have a unique DNS name for the device (e.g., dns_name.corp.customer.com). The name is used to access the device and therefore, must be listed in the server certificate. |
|
3.
|
Select the required TLS Context index row, and then click the Change Certificate link located below the table; the Change Certificates page appears. |
|
4.
|
Under the Certificate Signing Request / Generate Self-Signed Certificate Request group, in the 'Common Name [CN]' field, enter the fully-qualified DNS name (FQDN) as the certificate subject. Alternatively (or in addition), if you want to generate a self-signed SAN certificate (with multiple subject alternate names), then from the 'Subject Alternative Name [SAN]' drop-down list, select the type of SAN (EMAIL, DNS, URI, or IP), and then enter the corresponding value. You can configure multiple SANs, using the 1st to 5th 'Subject Alternative Name [SAN]' fields. |
For a description of additional (optional) parameters that you can configure such as 'Subject Key Identifier', 'Key Usage', and 'Extended Key Usage', see Assigning CSR-based Certificates to TLS Contexts. (The parameters under this group are applicable to both self-signed and CSR certificates.)
|
5.
|
Click Generate Self-Signed Certificate; the following confirmation message appears: |
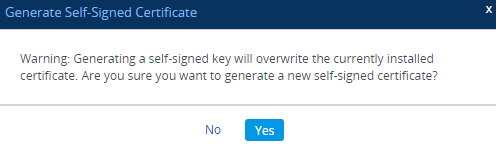
The self-signed certificate overwrites the currently installed certificate for the specific TLS Context.
|
6.
|
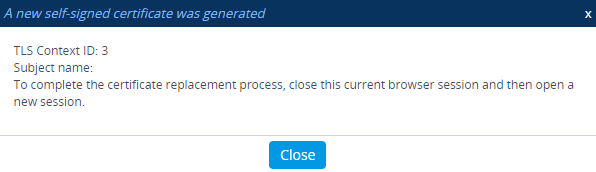
Click Yes to confirm generation; the device generates a new self-signed certificate (with new subject name) and the following message appears: |
|
7.
|
Click Close, and then quit your current web browser session and open a new browser session with the device. |
|
8.
|
Save the configuration. |